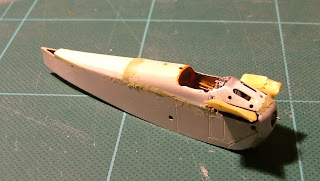
The first thing I had to do was reset the nose, which was at a bit of a slope. Getting it off was easy enough. I just brushed liquid poly along the joints and gently prised it away, with the result you see below:
 | |
| My Dolphin's got no nose. |
I used a lot of Milliput, actually, as you can tell from this shot:
When the filler was dry, I sanded it all smooth with 240 grade wet and dry, followed by 400. Milliput is great for this. It's a fine alternative to being arsed to mould the parts accurately in the first place, I think. However, I found out that that it's not really suited to filling gaps between thin panels, and tends to flake away after a bit of handling. Unlike a conventional kit, this model is not what you could call a rigid construction, and the panels do tend to flex a bit. You really need to strengthen the joints first before doing any filling. What I ended up doing was filling the gaps between panels with thick polystyrene cement and then smearing some more Milliput over it when it was dry. The great thing about Milliput is that if you mix a bit of water with it, you can fill fine surface scratches with a thin smear, and you only need a quick wipe with 400 grade wet and dry to finish it when it's dry.
At this stage, I also decided it was time to neaten up the ejection ports a bit. After various phases of bodging to make things fit, these had ended up larger than originally intended; certainly larger than the internal chutes. What I had to do was cut tiny bits of plastic strip to size and glue them in place. Then I sanded them smooth along with the Milliput. This worked reasonably well, but I'm going to have to square up the apertures with a knife at some point. But I'm putting that off for the moment. You want to be in the right frame of mind for a job like that.
The next job, which made my heart sink a bit in prospect, was recutting some of the panel lines. It made my heart sink because I'm rubbish at this job. But, let's face it, you can't have a scale model with panel lines missing. That's a crazy idea. (Though when it comes to paint effects, there is room for legitimate difference of opinion about the effect you should be aiming at by your careful preshading: do you want your panel lines merely overemphatic, giving your model an appearance oddly reminiscent of porcelain? or visible from space?). Anyway I did my best with the straight lines, using a steel rule and a scribing tool, but the line between the fuselage and the nose was, I knew, going to be problematic. I came up with a plan to build a jig to hold the fuselage vertical, and then scribe the line with a rigidly mounted scribing tool. But this didn't work. Whatever you do, there's too much play in the whole system. And I ended up flaking off a lot of the Milliput.
In the end, I added more Milliput and then scribed the line while it was wet, with a blade. This makes it easier to get a nice straight line. The result was still a bit wonky, but it'll have to do.
When I was thoroughly sick of messing about with Milliput (which is great, by the way, but you can get sick of messing about with it), I rubbed the whole thing down again, progressing to 600 grade wet and dry. Then I started work on the fairings for the cylinder heads. These were going to be vac-formed; but quite early on I had decided that it was going to be a thankless task trying to cut tiny mouldings to shape. Instead, I decided to carve them from solid.
I started with the front fairings, and some 2x4mm plastic strip. The idea was to do as much carving as possible before cutting the bits away from the length of strip, because they're so fiddly it's difficult to do much to them at that stage. I made both bits at the same time, doing one phase at a time. This makes it easier to ensure that they're identical mirror images. Once I'd got them carved to the basic shape, I kept measuring them up against the fuselage and working away at them until they were a reasonable fit. I've now got the starboard one in place, and once I've done the port one, I'll finish them both off with 400 wet and dry. The rear fairings will be the same kind of thing.
So that's where things stand at the moment. In case you were wondering.


No comments:
Post a Comment